Get Expert, Affordable Help For Your Computer Problems

Thursday, July 28, 2011

How to Make Windows 7 Run Faster : Easily and Quickly

Microsoft's Windows 7 is one of the most brilliant operating system ever made. Windows 7 is an improved operating system, but many people still complain that their system works slower and slower day by day and people are trying really hard for it to run faster, luckily there are some tricks to make windows 7 run faster. First you need to know hardware requirements of Windows 7.

The official requirements for Windows 7 are:

• 1 GHz or faster 32-bit (x86) or 64-bit (x64) processor
• 1 GB RAM (32-bit)
• 16 GB available hard disk space
• DirectX 9 graphics device with WDDM 1.0 or higher driver

If your system fulfills all these requirements but still runs slow you should optimize your Windows 7. Follow the following steps to make windows 7 faster.

Disable Windows 7 Aero

• Right click on the desktop and select "Personalize" and click "Window Color"
• Uncheck the 'Enable Transparency' option box
• Click on 'Open classic appearance properties for more color options'
• Choose a Standard theme from the popup.

Disable Unwanted Programs

There are several unwanted programs working in the background that you might not want so it's a good to disable all these programs as this might free lot of resources on your computer and will make your Computer run faster.

• Go to Start and enter 'msconfig'
• Click on the startup tab and uncheck the programs that you don't need

Disk Cleanup

Click "Start," "All Programs," "Accessories," "System Tool," then "Disk Cleanup." The "Disk Cleanup" dialog opens. Select the drive you want to clean up, check the files that you want to delete and click "OK." Click "Delete Files" to confirm that you want to permanently delete the selected files. Disk Cleanup begins removing the files. The program will automatically close when Disk Cleanup is finished.

Disable the Windows 7 Sidebar and Gadgets

If you never use the Gadgets, and if you want to disable the Windows 7 sidebar. Disabling windows 7 sidebar and gadgets will make your computer load faster

• Right click on the sidebar and then click on " Properties".
• On the properties windows un-check the check box displaying "Start sidebar when Windows Starts "
• Now windows sidebar gadgets won't automatically start when windows 7 loads

Online virus removal for computer : A review

If you are facing problem in your computer because of viruses the best method to fix virus issues of the system is online virus removal service provider companies. These kinds of service provider companies have Microsoft certified technicians, who are expertise and experienced to fix all problems related to virus.

Online virus removal is a reliable service, which has been opted by multiple users. These certified technicians are available throughout the day for instant virus removal. Online technical support for virus removal is one the cheapest way to keep your computer safe in and economical manner. For taking there support you have to pay one time payment lasting for the one year for which they will provide support in all aspects reading computer related issues.

The online virus removal support resources are assisting you everywhere over the phone or through Internet for fulfilling their commitment regarding making your computer virus and spyware free. The technicians of the service provider company can remotely access your computer and diagnose the root cause of the problem at the infected PC. Online tech support specialists can even reboot the PC and reconnect remotely. They can perform it only when you permit them for doing so. They can make a proper scan of the system through their virus removal software and find out the details of the viruses that have intruded into it. They can then eliminate those viruses and make sure proper working of your computer. The best thing with online virus removal service providing companies is that they keep on updating their software and are capable of detecting almost all types of viruses can remove them.

So, choose online virus removal support and protect your computer and sensitive data from the hackers.

Tuesday, July 26, 2011

How to Add Programs to Windows 7 Startup

Microsoft has made many changes in Windows 7 Operating System. Startup program settings are similar to those of previous operating systems. Startup folder is the folder which contains the links to programs which are started when Windows is booted. This blog explains how to add a program to the Windows 7 startup to start the program automatically when Windows starts.

• Click the Windows “Start” button and select “All Programs.”

• Right-click the “Startup” folder and select “Open All Users.” This option opens the start up folder for all users on the computer.

• Choose “Explore” to open the folder for the currently logged-in user only.

• Go to the file or folder you want to add to start up and right-click and select the option “Copy Shortcut” from the menu. Alternatively you can also create a shortcut on desktop.

• Now paste this shortcut in the startup folder which you opened in first step.

Monday, July 25, 2011

How to Download Yahoo Mail Into Outlook

You can use Microsoft Outlook with many email accounts. But Yahoo does not provide free POP and STMP access to the users of its free Yahoo mail. If you are a Yahoo email user and want to read and send your yahoo email with Outlook or If you want to "POP" your Yahoo Mail into your Outlook 2007. Here in this blog I have tried to explain how to set up Outlook to read and send Yahoo mail.

Steps to download Yahoo Mail into Outlook

• Open Microsoft Outlook.

• Select 'Email Accounts' from the Tools menu.

• Select 'Add New Email Account.'

• Select 'POP3' followed by the 'Next' button.

• Enter all of your required user information, including your entire email address.

• Specify the server information for the Yahoo Mail account: 'pop.mail.yahoo.com' and 'smtp.mail.yahoo.com.'

• Click the 'Advanced' tab and change the POP3 port number to '995.' Change the SMTP number to '465.'

• Be sure the 'Log-In Requires Authentication' is unchecked on the main page.

• Click 'OK' once all of these parameters have been entered, followed by the 'Finished' button.

If you followed the above configuration steps, you should be all set. However, if you cannot send
or receive mail with your email client, then read our blog “Troubleshoot error messages when trying to send and receive e-mail in Outlook Express” for fixing send and receive error message.

Thursday, July 21, 2011

Windows Vista Stops Responding While Trying to Boot

Windows vista is considered as the most secure and the reliable Operating system. But at the same time bugs and the errors can't be ruled out. That’s the reason we face problems in Windows Vista. One of the typical symptoms is that computer might fail to boot, displaying STOP errors on screen. This issue can occur if any one of the file required to boot the system is missing or damaged. To fix this issue you need to reinstall windows vista and restore the information from current data backup. If you facing problem with your backup, scan your hard drive using commercial data recovery applications or contact Windows Vista Technical Support at their Toll Free No. +1-877-452-9201.

Steps to follow if Windows Vista Stops Responding While Trying to Boot

• To fix this issue, you should have Windows Vista installation disc.

• Insert the installation disc and boot your system

• select the desired language and click on “Next”.

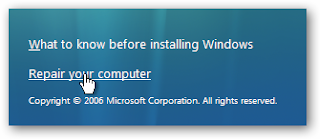
• Select 'Repair your computer' option

• You need to then select the operating system to be repaired in 'System Recovery Options' dialog box

• In the same dialog box, click to choose 'Startup Repair' option

• Startup Repair will automatically try to detect and correct startup problems that prevent Windows Vista from booting. Click Finish when the process gets completed.

Wednesday, July 20, 2011

How to Archive Old Mail in Outlook

Microsoft Outlook is designed to operate as an independent personal information manager, as an Internet mail client, or email, and task management. Now days many people uses Microsoft Outlook, but don't know how to archive the old email to save on disk storage space. In this Blog I have tried to explain how to archive old mail in Outlook . If you are not advance users I will not recommended you to change setting I will suggest you to look for Microsoft outlook support :-

Steps to archive old mail in Outlook

• First of all choose how often you want to archive Outlook email yearly, quarterly or monthly.

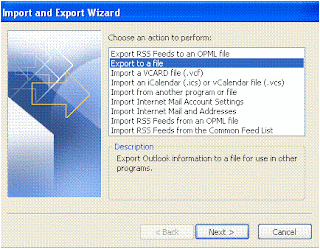
• Open the Microsoft Outlook and then click on "File" select "Import and Export" option.

• Under the heading, "Choose an action to perform." click on the "Export to a file" option and then click the "Next" button.

• Select the "Personal Folder File (.pst)" option listed under the heading, "Create a file of type." Click the "Next" button.

• Select the folder you want to archive under the heading, "Select the folder to export from."

• Decide where you want to save the file archive. Click the "Browse" button under the heading, "Save exported file as." Browse the folders until you find the one in which to store the Outlook email archive file.

• Name the archive file and click “ok”

• Choose any other applicable options in the "Export Personal Folder" dialogue box. Click the "Finish" button to complete the export of the Outlook email archive.

How to Invite Remote Assistance on Windows 7


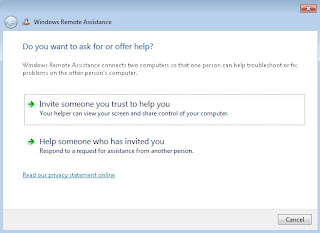
When something goes wrong with the computer, and you don’t know how to fix the issue. So, you try to contact somebody for help. For this Windows has created Windows Remote Assistance feature, which allows to anyone, with your permission of course, connect remotely to a computer via a local network or the internet. You must invite the remote person before a connection can take place. Use the Easy Connect method if the other person is also using a Windows 7 computer. After the initial successful connection, the person appears in a contact list to simplify future invitations. Create and send an invitation file if the other person is using a different version of Windows.

Steps to send Invitation File

• Click the "Start" and type "Remote Assistance" in the "Search" box.
• Select "Windows Remote Assistance" from the list that appears.
• Click "Invite someone you trust to help you."
• Click "Save this invitation as a file" and select "Desktop" as the save location.
• Use your regular email program or website to send the file from the Desktop to the remote person.
• Communicate the 12-character password that appears to the remote support person, who will use it to connect to your computer when they open the invitation file. Click "Yes" to accept the connection.

Easy Connect

• Click the "Start" button and then type "Remote Assistance" in the "Search" box.
• Select "Windows Remote Assistance" from the list that appears.
• Click "Invite someone you trust to help you."
• Click "Use Easy Connect."
• Communicate the 12-character password to the remote support person, who will use it to connect to your computer through Easy Connect. Click "Yes" to accept the connection


If you are facing any problem while performing this steps you may take help from windows 7 support professional's at their Toll Free No. +1-877-452-9201

Friday, July 15, 2011

How to Remove the Google Redirect Virus

Google redirect virus is also known as search engine redirect virus because it also affects Yahoo and Bing search results too. This virus gets installed through a trojan horse and when you search on Google for something, It hides the Google results and shows you advertisements or affiliate links related to that subject. The symptoms of Google redirect virus are :-

• Google search result links will be redirected to unrelated sites

• The inability to run various programs. When you attempt to run certain programs, you will not receive an error, but they simply will not start

• It will infect Internet Explorer, Firefox and then redirect you to malicious websites showing advertisements and pop ups.

• The inability to access various sites.

• Web browsing is slower than normal.

Steps to remove Google redirect virus

• Click on "Start” and then click “Run" type "devmgmt.msc" and Click on "OK". This will run Device Manager. In Device Manager, click on "View” and then click “Show Hidden Devices".

• Expand all the devices by click on the "Plus" sign. Now try to find "TDSSserv.sys" right click Disable.

• After disabling the TDSSserv.sys, please download a Spyware Remover and remove Google redirect Virus completely from your system. Please note that you need to remove several registry entries to remove it completely and you never know If you have other threats in your system.

If you need professional assistance regarding any issue then you can reach V tech-squad virus removal support at their Toll Free No +1-877-452-9201 For US/CA.

Wednesday, July 13, 2011

Computer Virus Removal Guide

A virus is a type of software that may be installed to your PC while you are surfing websites. Once a virus is installed to your computer you cannot remove it manually. You either need to use a best free online virus scan and removal program or format your hard drive. To protect your computer from such harmful programs, you should avoid visiting those websites that require some type of downloads to visit all pages and avoid reading emails that are coming from an unknown sender. Never participate in any kind of scams.

Best free antivirus software can be used as a preventive measure to protect your computer from viruses. There are many very good anti-virus software avilable, but best antivirus software I would like to suggest are AVG, Avira, Avast, Microsoft Security Essential and Norton Antivirus they can be downloaded on the companies website. Just do a Google search for " Microsoft Security Essential " or "free avira" and you will find them and download. You can download and install either of these programs totally free. Once you install them, you simply scan your computer, delete the viruses it finds, restart and scan again.

Below are some easy virus removal steps that you can follow to protect your computer from harmful viruses and malwares

1. Scan your computer regularly by running your antivirus software.

2. If viruses' bar you from installing any antivirus program or do updates then restart your system and get into "safe mode with Networking" and run your antivirus software and delete any references you found

If you are facing any problem in performing above steps then you can reach V tech-squad for online virus removal support at their Toll Free No +1-877-452-9201 For US/CA

How to Change Programs at Windows Startup

One of the main reasons why your Windows takes so long to boot when you switch it is due to the number of programs that run at system startup and this is the place for you to identify and disable them. In Windows operating systems, certain Terminate and Stay Resident (TSR) programs are initiated during startup. Often, users will need to modify the startup process to stop the loading of some TSR programs. A Windows utility program, the System Configuration Utility (msconfig), is provided with each operating system installation. This utility will enable the user to modify the Windows startup process and the programs initiated during this process.

Steps to change programs at windows startup

• Click the "Start" button on the Windows desktop.

• Select the "Run" option.

• Type "msconfig" into the Run input box.

• Click "OK." A window with five tabs will appear.

• Click the "Startup" tab. A list of programs with checkboxes will appear.

• Uncheck each unneeded startup program. By using the msconfig utility, changes made to the startup process may be easily reversed.

• Reboot the computer. Windows will now start only the TSR programs specified with the configuration utility.

Many of you may have already have your hands on Windows 7 and must be exploring it. Waiting for your Windows to shut down completely can be a frustrating if you want the shutdown time to be much faster than what it is now read our blog “How to speed up shutdown time in windows 7”

Tuesday, July 12, 2011

How to fix "BOOTMGR is Missing" error

Windows requires the "BOOTMGR" file to load the operating system when you turn on the computer. The “Bootmgr is Missing” Error is a problem that indicates your computer could not locate your Windows installation. The most common reasons for BOOTMGR errors include corrupt and misconfigured files, hard drive and operating system upgrade issues, corrupt hard drive sectors. You can correct the error using the Windows 7 installation DVD, which contains a bootup repair module for corrupted or missing boot files.

Steps to Fix "BOOTMGR is Missing" error

• Insert the Windows 7 installation DVD in the computer's drive. Press the "Reset" button on your computer's case to reboot the computer. When the command prompt asks if you want to boot to the DVD, press any key to open the Windows 7 installation window

Select your language, time zone and keyboard settings in the first installation window. Click "Next."

• Click the "Repair Your Computer" link at the bottom-left corner in the next window. The list of repair options display on the next screen.

• Click the "Startup Repair" option. Windows searches for any corrupt or missing boot files including BOOTMGR. The missing file is replaced on the hard drive. After the repair process completes, remove the installation DVD and reboot the computer.

Monday, July 11, 2011

How to Restore Master Boot Record

The Master Boot Record holds the boot information and partition layout for the whole disk. MBR required in order to create or maintain partitions on the disk, or even boot the computer. The MBR stores the data that initiates the loading of your computer's operating system. When this data becomes corrupted, the computer can no longer load the operating system. So it is important to have a backup of your MBR just in case something goes wrong that messes up the MBR. In this blog we have tried to explain how to Restore MBR.

Steps to Restore the MBR in Windows 7 or Vista

• Insert the installation disk, and restart the computer.

• Select a language, a time, a currency and an input device/ Click "Next." Click "Repair Your Computer.

• You should now see your operating system. Select it and click "Next

• Under Choose a Recovery Tool, find and click "Command Prompt." In the command prompt box, type in "Bootrec.exe." Press "Enter."

Steps to Restore the MBR in Windows 7 or Vista

• Insert the installation disk, and restart the computer.

• Press the "R" key to start the Recovery Console once the "Welcome to Setup" windows appears. Select your operating system.

• Enter your password. If you do not have a password, leave the field blank. Press "Enter." You will now see the command prompt window. Type in "fixmbr." Press "Enter.

If you are facing any problem while performing this steps you may take help from windows 7 support at their Toll Free No. +1-877-452-9201

Friday, July 8, 2011

How to find a reliable online technical support

The importance of computers cannot be denied. Computer has become an important part of our daily lives. Let it be a student, office worker or a house wife, no one can afford even a little interruption in their computer processing for too long. Therefore, professional online technical support is a mandatory option to keep in site. You might wonder that how can I find a reliable online technical support. There are plenty of companies that offer great technical support services on the internet. These online technical support companies provides support for :-

• Printer
• Computer
• Virus Removal
• Wireless
• Software Help

Steps to find a reliable online technical support

• Visit a search engine such as Google or Yahoo.

• Type in keywords "online technical support " Add the specific area you're seeking help in to narrow your search.

• Press Enter on your keyboard or click the Search button to submit your query.

• Click on a site that best suits your interests or needs from the list of search results provided by the search engine.

• Follow the directions provided by the site to gain access to the support you need.

• Click the Back button on your Web browser to return to the list of search results and choose another site to explore.

Thursday, July 7, 2011

How to Remove Norton AntiVirus 2009

Norton Antivirus 2009 protects your computer against the latest viruses, spyware, and other threats. Delivers fast, powerful online protection to keep you a step ahead of cyber attacks. There are many free as well as paid antivirus software available for windows but Norton is the one big name and preferred antivirus software. But sometimes you have to remove Norton due to a corrupt installation or because of compatibility issues. In this blog we have tried to explain how you can uninstall and completely remove Norton Antivirus 2009 Software from your computer.

Steps to Remove Norton Antivirus 2009

• Download the Norton Removal Tool from Norton's website. Norton Removal Tool is official free Norton antivirus removal tool which can remove many Symantec product. Save the download to your desktop.

• Close any open applications, including your Internet browser, and double-click the downloaded "Norton Removal Tool" icon on the desktop. The removal tool screen will appear and warn you that by pressing "Next" your Norton AntiVirus will be removed. Click "Next." The tool will begin the removal process.

• Click "Restart Now" when the removal tool is finished. Norton 2009 AntiVirus will no longer be installed on your computer once your computer restarts.

Tuesday, July 5, 2011

The Best Software for Virus Removal

If you regularly user of internet a Windows-based computer, it is inevitable that at some point your system will get infected with a virus, spyware, malware or some other type of malicious file. it is important to secure your PC with the most up-to-date antivirus program. The software listed are the top five antivirus program available in the market.

Norton Antivirus 2010

Norton Antivirus 2010 is developed and distributed by Symantec Corporation. Norton Antivirus 2010 features the latest in antivirus protection and removal. Email protection, network protection, identity protection all come standard in this security suite

Trend Micro Internet Security Pro

Trend Micro Suite is one of highest rated security suites on the market. It features all of the standard security applications including virus removal and protection, pop-up blockers, automatic scanning and automatic updates. It also features the ability to remotely protect sensitive files in the event that your computer is lost or stolen.

AVG Antivirus Free

AVG Free from Grisoft is the top rated free antivirus software on the Internet. While it does not feature the "extras" of purchased software, it comes with top of the line antivirus removal and protection and offers users regular updates and custom scans. AVG is available online at no cost and supplies basic protection.

Microsoft Security Essentials

Microsoft security Essential is free antivirus program for Microsoft . Microsoft Security Essentials provides real-time protection for your home or small business PC that guards against viruses, spyware, and other malicious software.

Monday, July 4, 2011

How to update Microsoft Security Essentials manually?

Updates are necessary whether it is your Windows Operating S, antivirus program. Updates help keep your computer run smoothly by repairing the internal glitches and bridging any loopholes. In the same fashion, your Microsoft Security Essentials needs to be updated with latest virus definitions as these enhance its defense system to deal with latest and everyday growing threats. Below are the simple instructions that will help you update your antivirus program smoothly:

Steps to update Microsoft Security Essentials

a. First check which Windows version you have. You can check it by pressing the ‘Windows’ key and ‘Pause/Break’ key together on the keyboard. It will take you to the properties of Windows OS. Check if you have 32-bit, 64-bit version.
b. Open your web browser viz. Internet Explorer (IE) or Firefox etc.
c. Go to https://www.microsoft.com/security/portal/Definitions/ADL.aspx?wa=wsignin1.0 (you can also copy and paste this link in your browser’s address bar and hit ‘Enter’ on the keyboard).
d. Click to choose whichever Windows version you have to download the latest definitions.
e. When a dialog box opens (mpam .f etc., vary with your Windows version), click on ‘Save File’ and save the file to your preferred location.
f. Double click on the file icon to open and run it. Now let the updates be downloaded to your PC. It may take some time so wait for the process to finish.
g. When the updates file is running, a file extraction dialog box will appear. The box will show that the updates are being downloaded.
h. When the downloading is finished, the box will be closed automatically. If it doesn’t you can close it.
i. If you want to check whether the updates have been downloaded or not, open the ‘Microsoft Security Essentials’ and click on the ‘Updates’ tab. It will show a message ‘up-to-date’.